 Navigation
How To Setup An Ethereum Wallet And Buy A Custom Token – A Guide for Coinbase Users
Learning how to setup an Ethereum Wallet outside of a centralized exchange, like Coinbase, is important for any person wanting to invest more into the Cryptocurrency space. Centralized exchanges carry a heavy risk – your assets can get frozen, lost, and mainly, controlled by the Government. Just read about the Mt. Gox scandal.
In addition, you are limited to holding simple currencies – like Bitcoin, Ethereum, and Litecoin in Coinbase for instance. You aren’t able to interact with any contracts on the Ethereum network or do anything besides have the coins in there.By holding your own wallet, you can use your funds for whatever purpose – for using them in different Ethereum programs, buying/selling your own custom tokens, or participating in an ICO.
So in this tutorial, I’m going to show you
- how to setup your own wallet outside of a centralized exchange to one that YOU own
- transfer your Ether to the new wallet, and
- purchase a custom token.
Setting Up MyEtherWallet
The first thing you want to do to is to set up your own wallet outside of a centralized exchange, like Coinbase. Coinbase is a great service to buy and sell ETH, however, it’s downfall is that it is centralized. This means that if their servers go down or the government sues Coinbase, your funds could be at risk.
By setting up your own decentralized wallet, you free your assets from being controlled by a third-party – meaning you have 100% control of your assets as they are stored on the blockchain and not a third-party server. There are many ways to do this, however, in this tutorial, I will teach you a simple way to set up a wallet, within minutes, with MyEtherWallet.
First, head to www.MyEtherWallet.com.
You will see a screen like this:
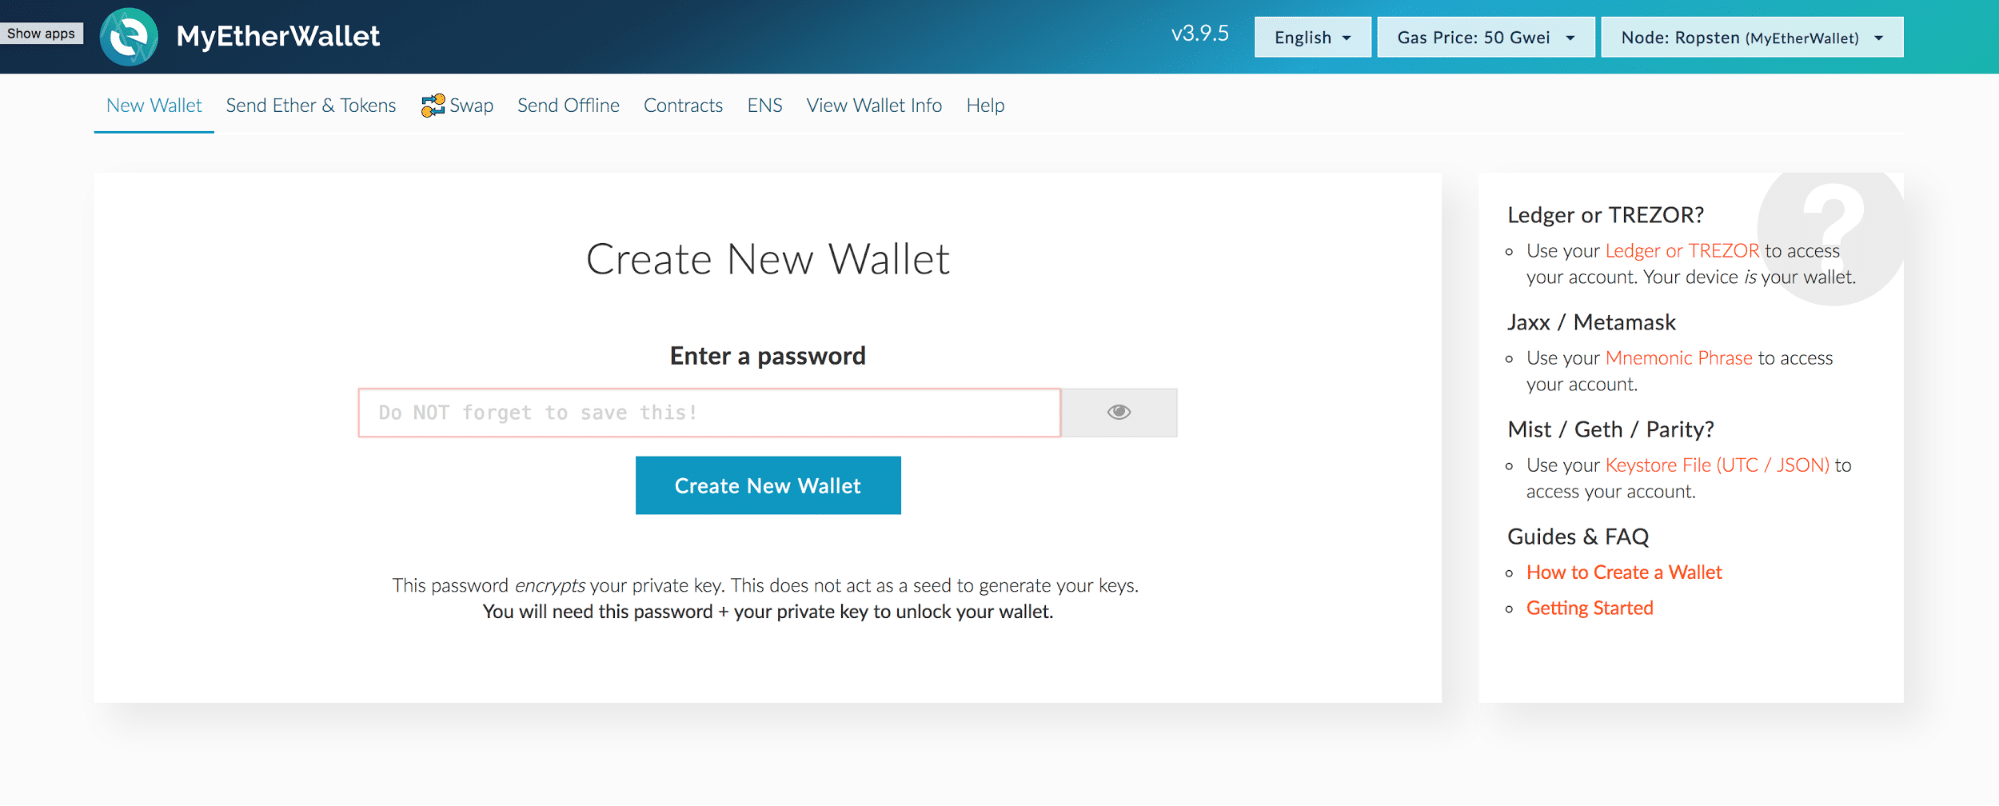
Choose a password, preferably something long with numbers and characters.
A good example of a password would be: V*N^vh7%T3wavZVa
A bad example of a password would be anything with your initials, middle name, dog’s name, or anything that people could potentially guess.
StrongPasswordGenerator can generate a strong password for you.
Make sure you write this password down. If you forget this password, you could lose your wallet (and funds) forever.
Once you’ve put in your password that you’ve written down, click ‘Create New Wallet’.
Next, you’ll get a screen that says ‘Save your Keystore File’. This is your wallet file.
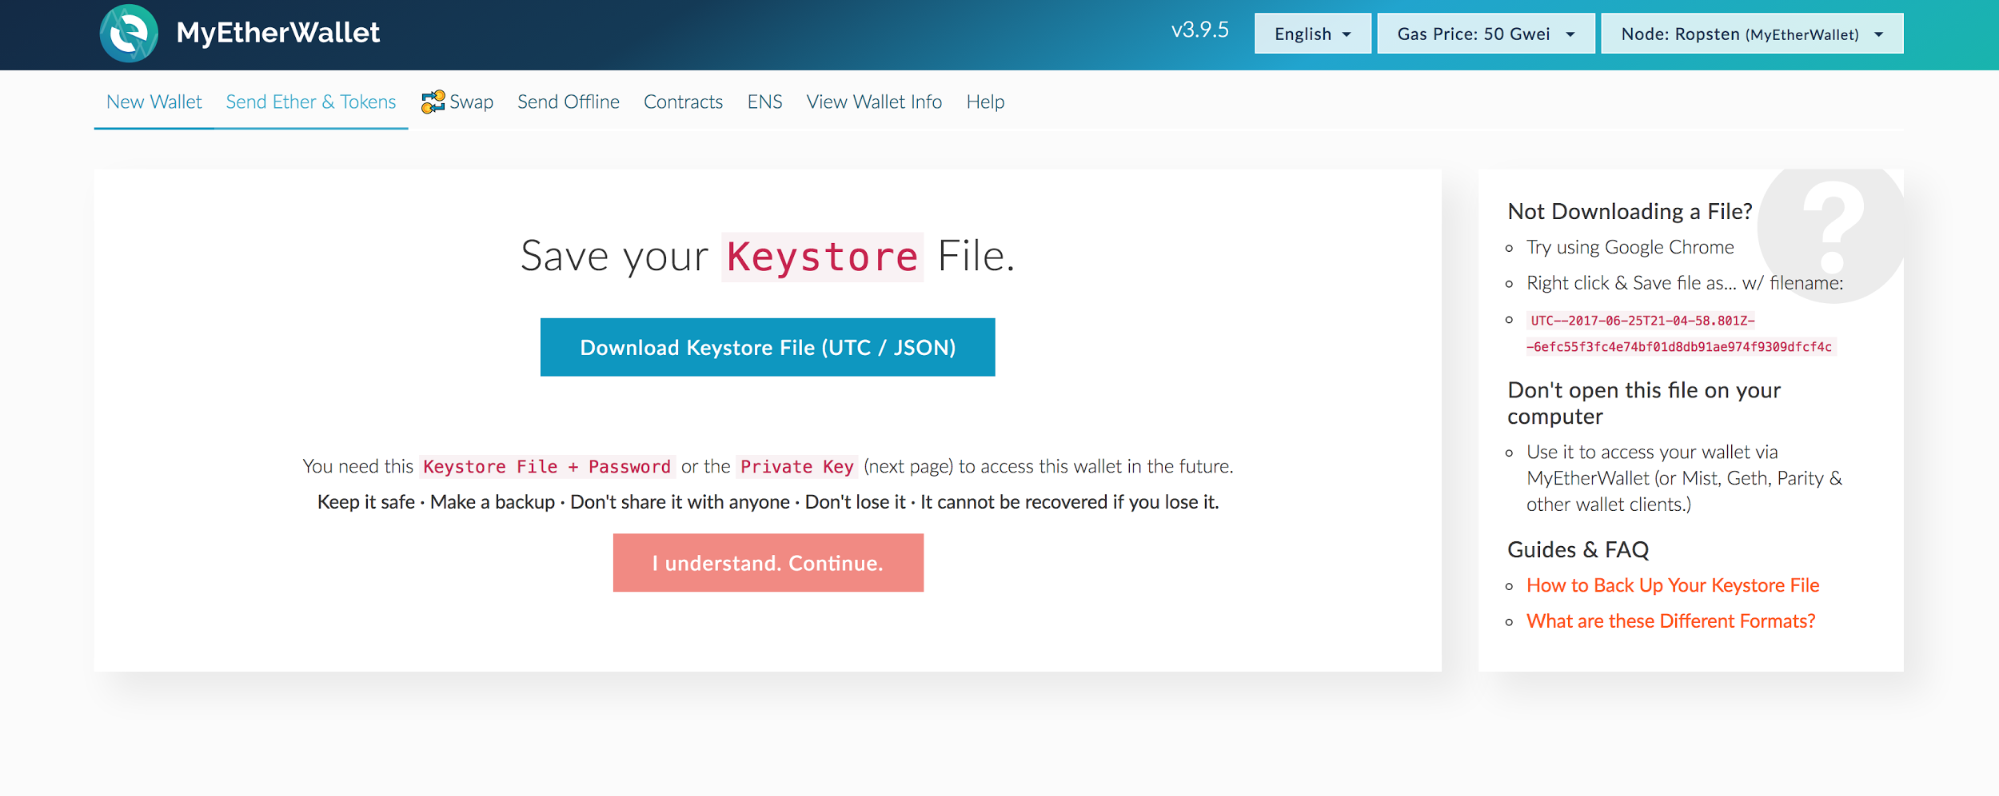
Click ‘Download Keystore File’ and copy this file to multiple locations, such as your Documents folder and an external USB drive.As the warning says on the website, do not share this with anyone. If they know your password and have this file, they can access your funds. This file is for you and for you alone.
Once you’ve downloaded the file, click “I understand. Continue.”
It will take you to a page with what’s called your ‘Private Key’, that looks like this:
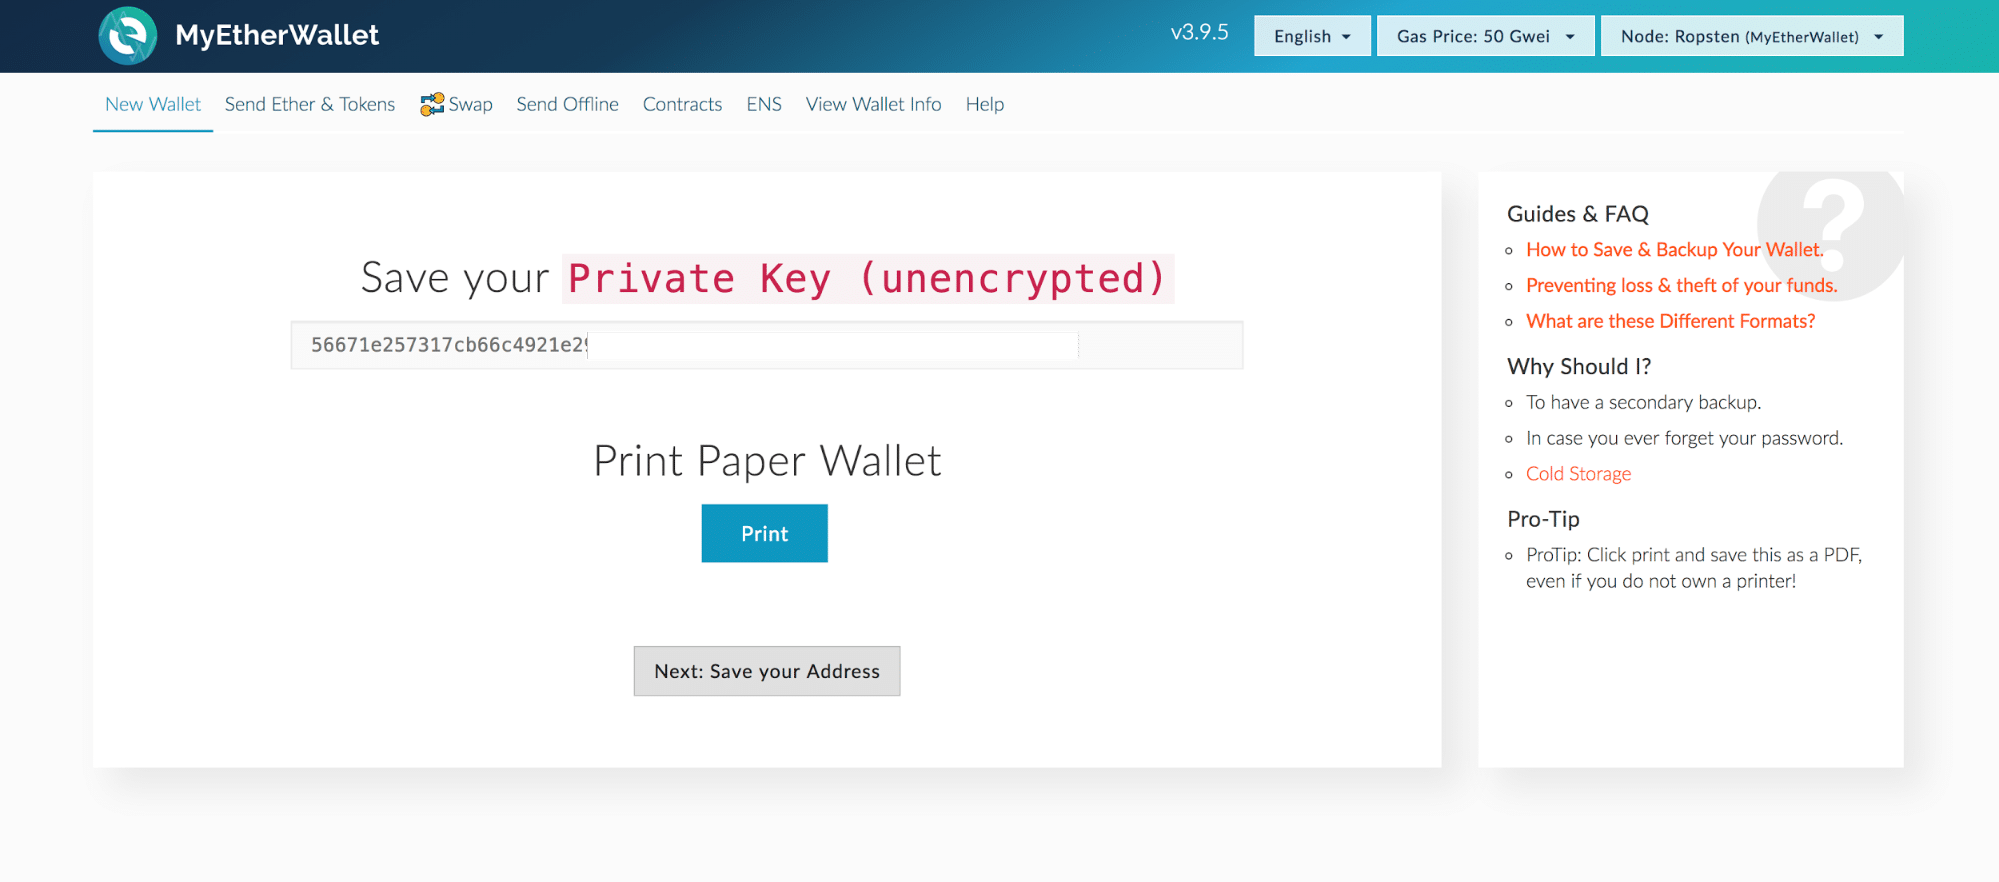
Your ‘Private Key’ is another way to access your wallet, without having your ‘Keystore File’ and password.
Do not store this key on your computer.
Rather, click “Print Paper Wallet”, which will print your wallet address with the private key to, you guessed it, a piece of paper. It looks like this:
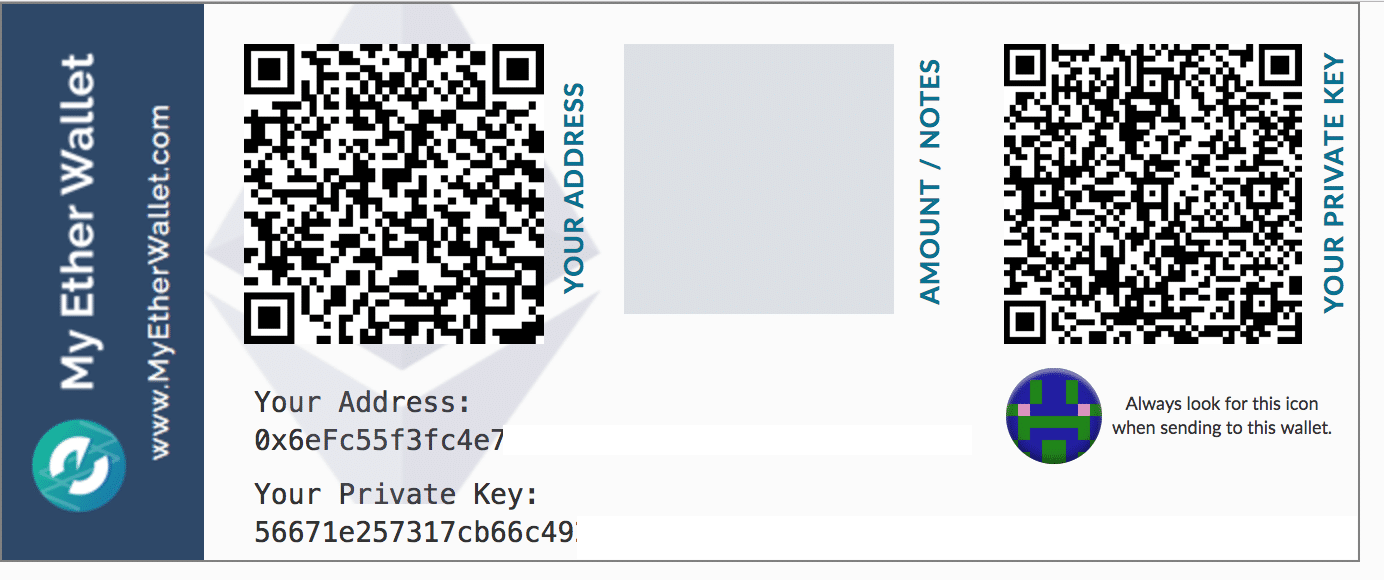
With this piece of paper, you will be able to access your wallet with the information it provides.
Remember to keep this piece of paper safe – if someone has access to this, they can access your wallet.
Click “Next: Save Your Address” when you’ve got it printed.
You officially now have a wallet that YOU own!! Let’s see what’s inside your wallet…
You should now see a login screen that looks like this:
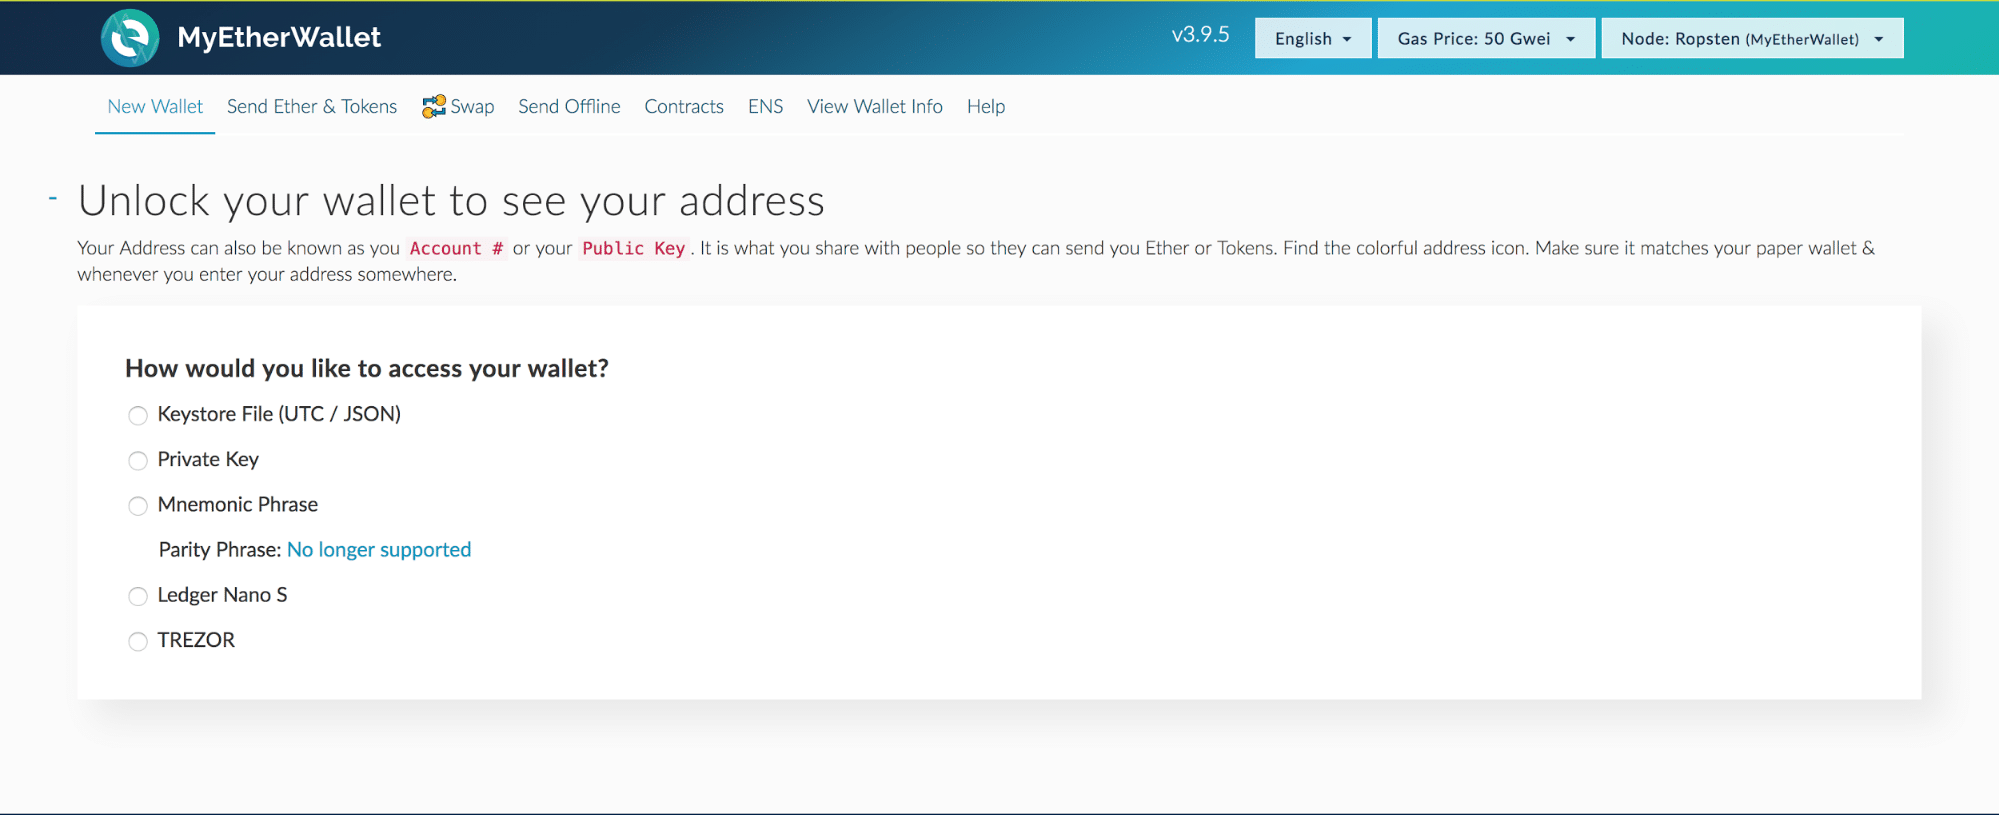
This is the screen you’ll get any time you try to do something in MyEtherWallet – you’ll have to “unlock” your wallet using either your Keystore file and password or your Private Key that’s on the paper wallet that you just printed out.
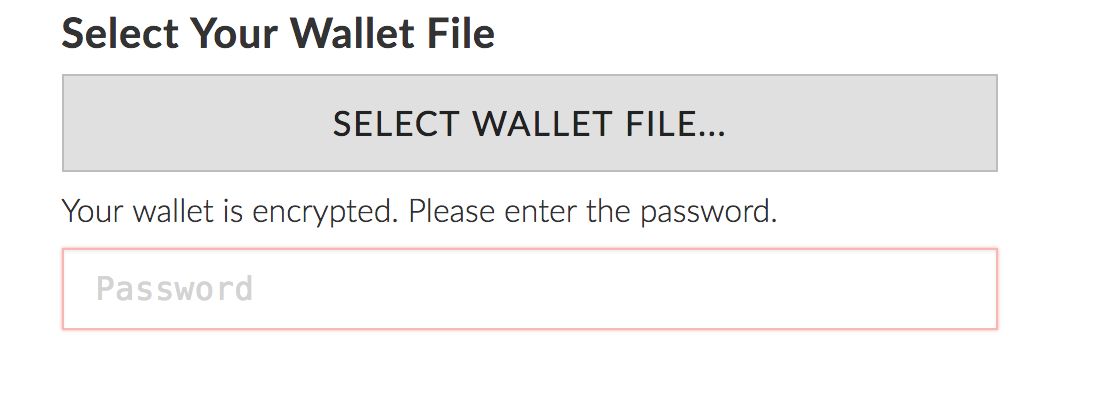
You can use either – but for now, select “Keystore File” and select the file that you downloaded onto your computer at the beginning of the wallet creation process.
The name of the file will look something like “UTC–2017-06-25T16-57-01.504Z–243d975bf1f9f9f9f9e9f9ddf360”
Once you select your wallet, enter the password that you used to create the wallet.
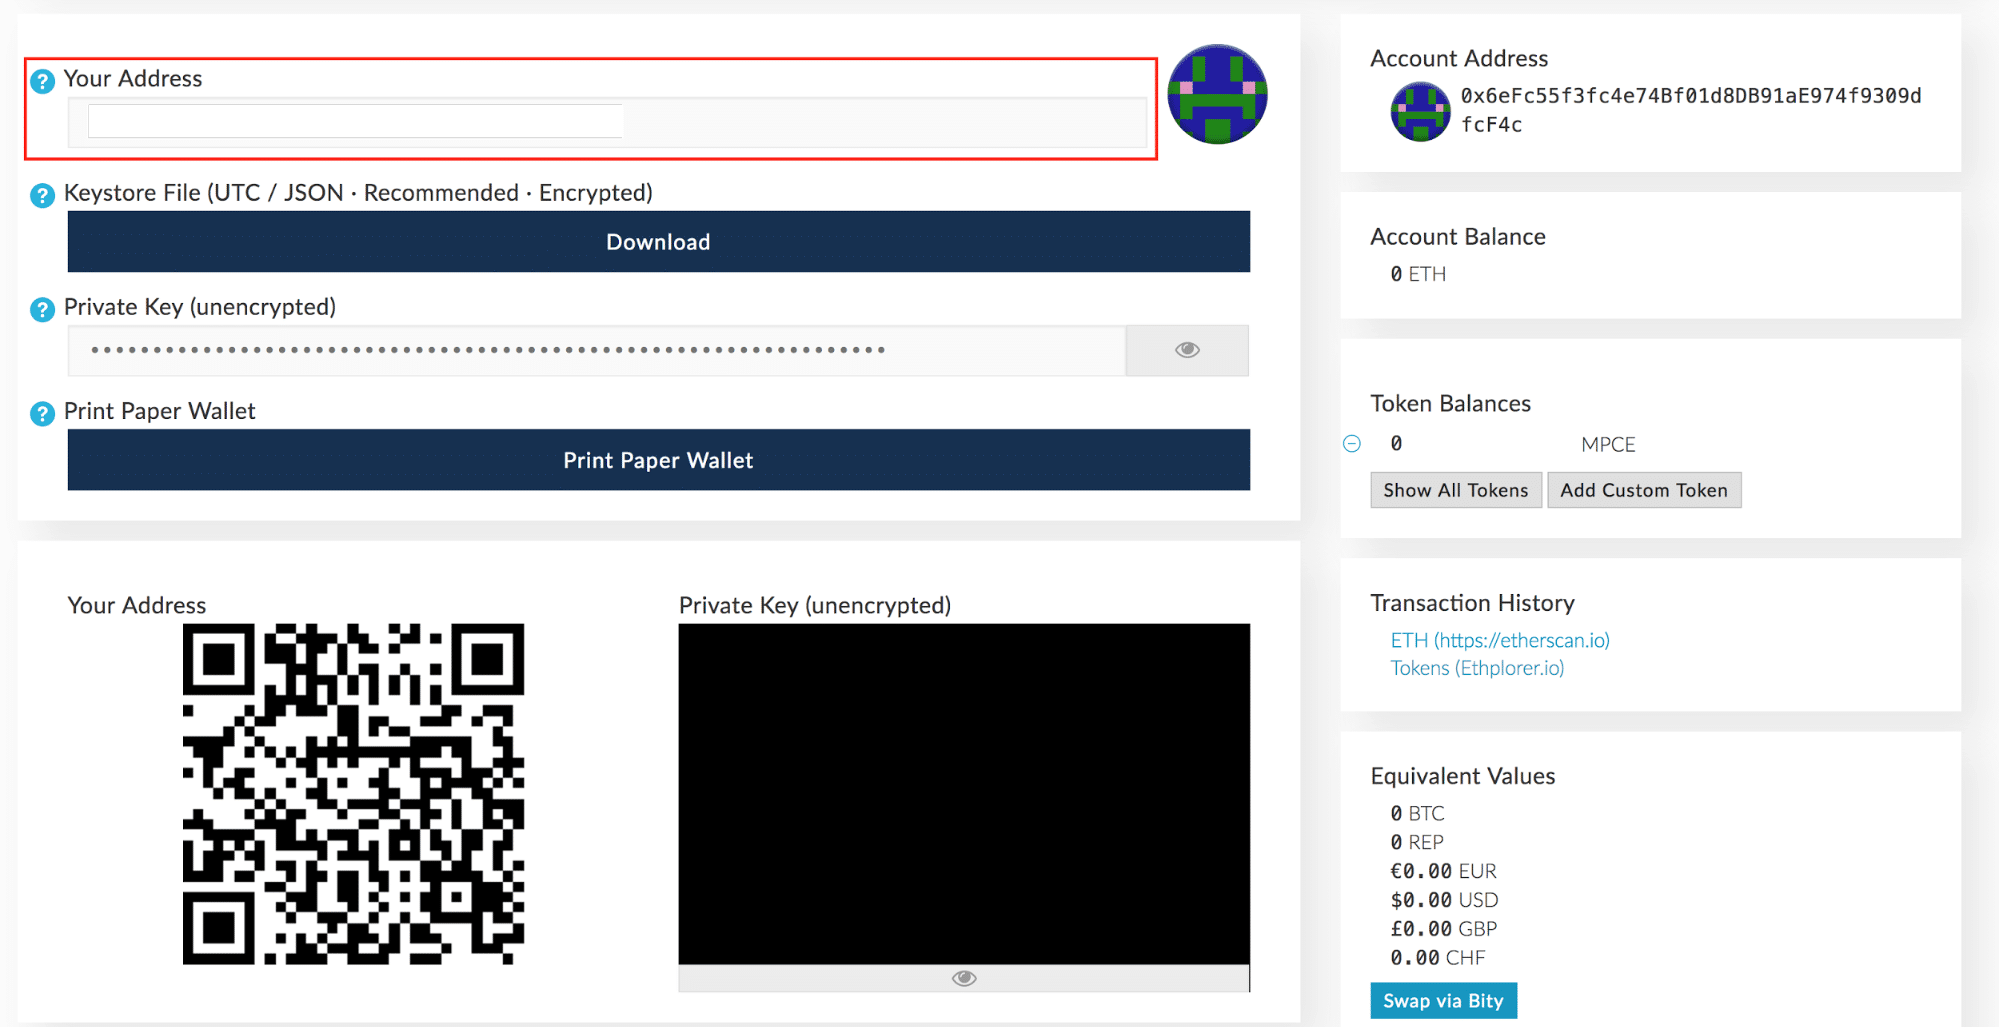
When you unlock your wallet, your wallet information will appear below, like this:
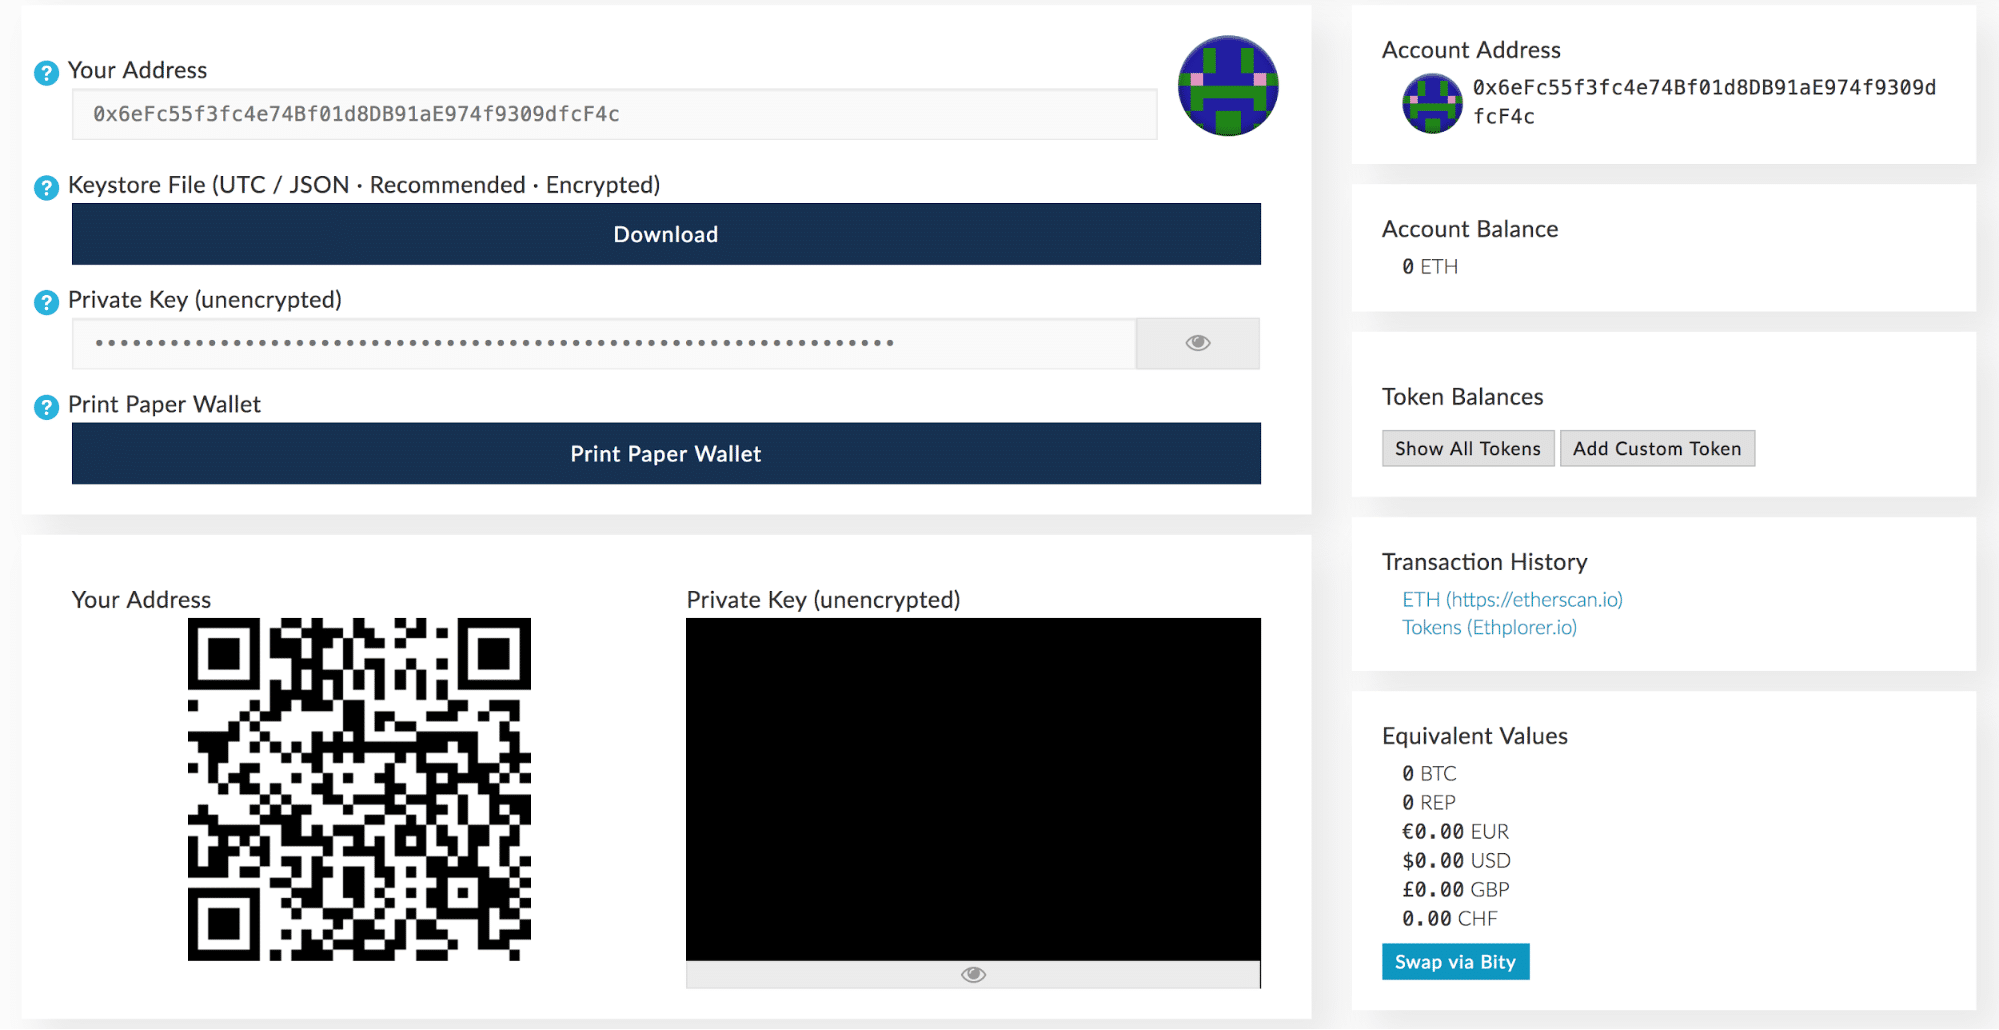
Your Address is the address of your wallet. You’ll use this address to receive funds, like ETH and custom ethereum tokens.
Sending from Coinbase to MyEtherWallet
After you have your own wallet, you’re going to want to send Ether from your Coinbase account to fund the wallet.
I suggest moving your funds off of Coinbase, at least the ones that you’re not immediately selling and want to store.
To send ETH from Coinbase, visit the Send/Request page.
You’ll get a screen that looks like this:
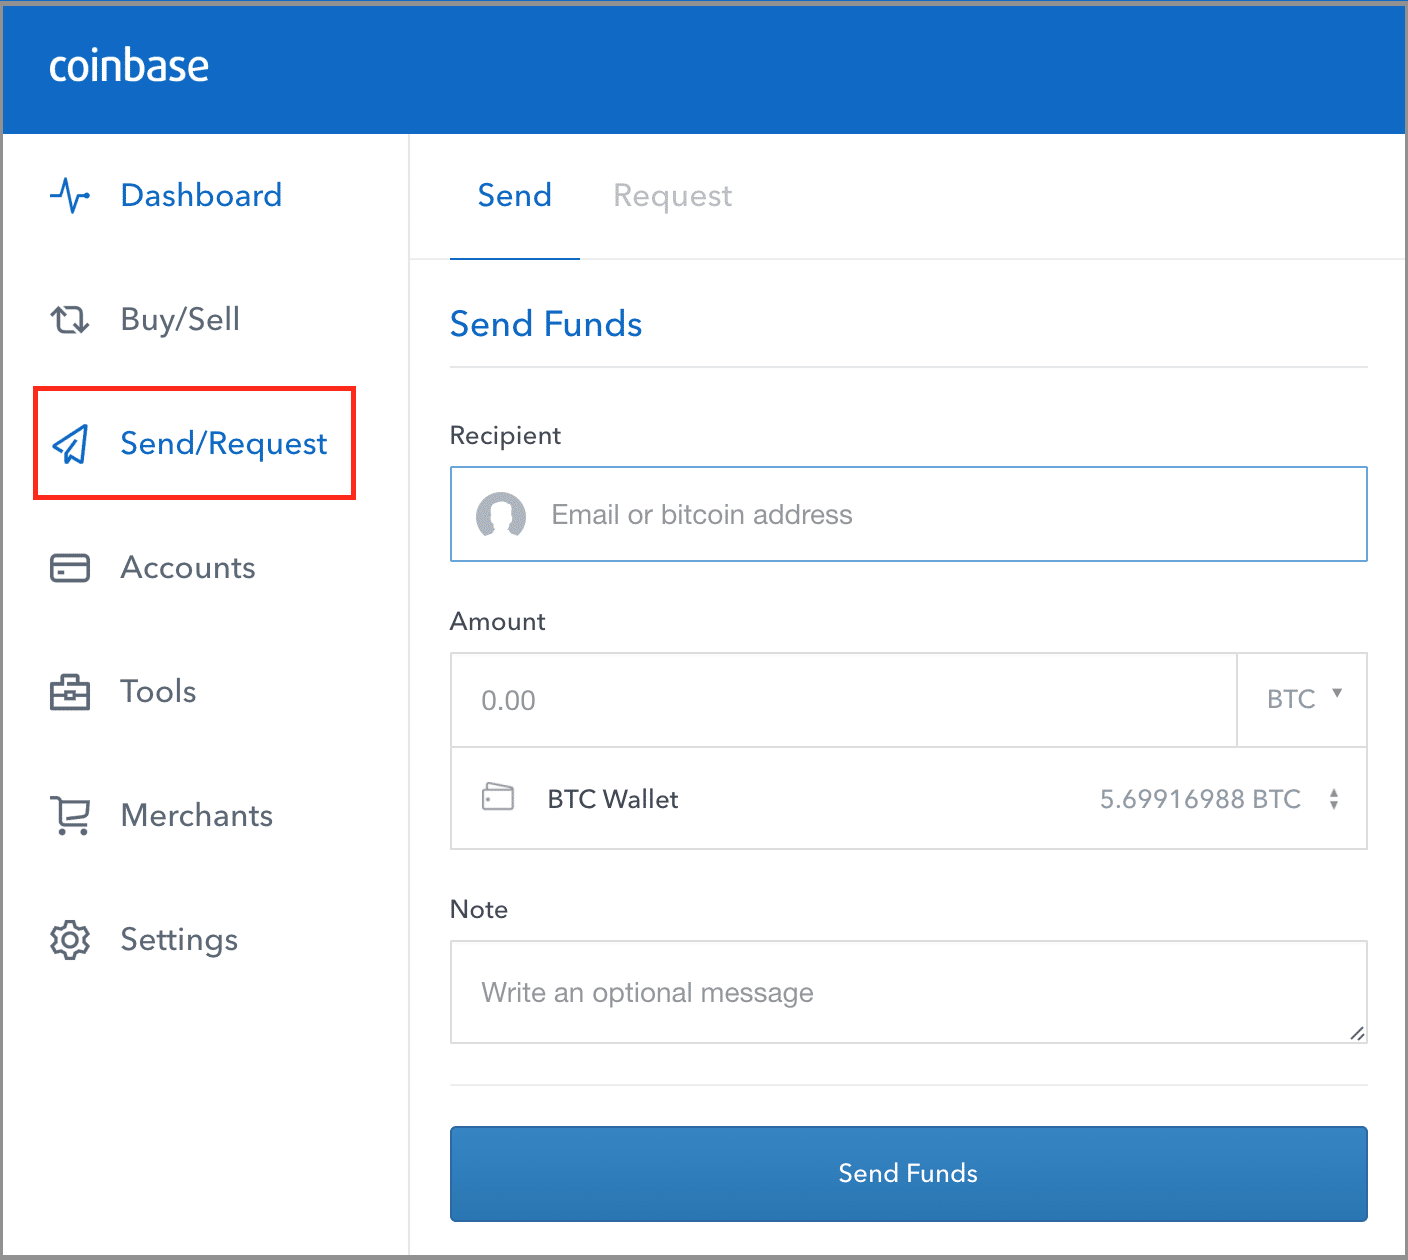
In this Recipient address, make sure you copy YOUR address from your MyEtherWallet website.
For Amount, put at least .002 to cover transaction fees, and make sure you select your ETH Wallet (above it says ‘BTC Wallet’).
IMPORTANT: Always test these transactions with a very LOW amount of ETH to test that everything’s working. You never want to start off with any amount of ETH that you’re not willing to lose.
Click ‘Send Funds’, and your ETH will be sent to your MyEtherWallet address to then use to buy your token(s).
Now if you unlock your MyEtherWallet by using your Private Key or Keystore File/Password, you should see your ETH that you just sent over. If you don’t see it, wait a few minutes and refresh – it sometimes takes the blockchain a bit to confirm a transaction.
Next I’m going to teach you how to buy your own custom token as you would in an ICO. For this example, we’ll use a token that I created for the purposes of this tutorial.
It’s called The Most Private Coin Ever, however you can substitute any of these values for different custom tokens and different ICOs.
“Watching” The Most Private Coin Ever
Because custom tokens aren’t technically currencies – they’re simply a program that says it’s a currency, you have to “watch” the program that’s telling you the rules.
By watching the “Token Address”, you’ll be able to see how many tokens you have and will be able to send/receive them. Without watching it, you won’t be able to interact with them, even if you’ve bought some.
So let’s set up your wallet so that you can see how many tokens you have. In this case, we’ll watch the Most Private Coin Ever token to see how many of those you have.
Over on the right column, there is a box titled “Token Balances”.

Click the ‘Add Custom Token’ button.
You’ll then be presented with a screen that looks like this:
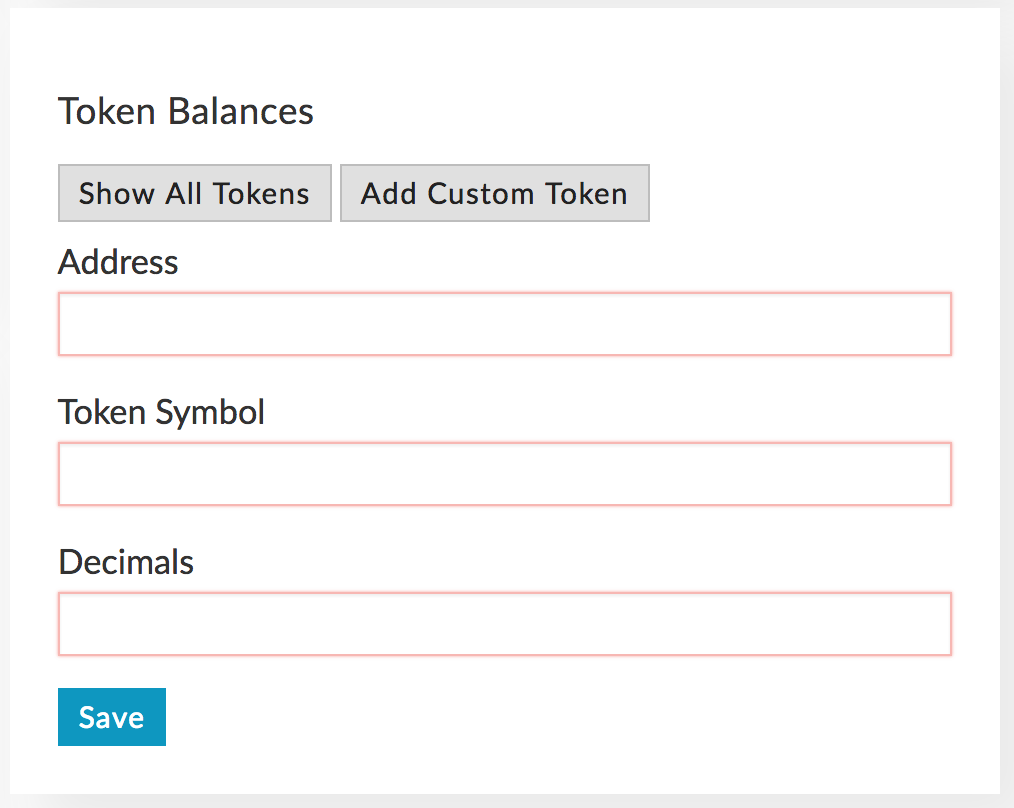
For the Most Private Coin Ever, put 0x1a645debd700890f1bc93626078d89e260bd09ce
This address, in other cases outside of this tutorial, would be the Token Address that they’ll tell you about in the ICOs instructions.
For Token Symbol, put MPCE
The token symbol here is arbitrary – it doesn’t really matter what you put in. Technically, the symbol for the Most Private Coin Ever is ???, however some wallets don’t accept question marks in this field – so just put MPCE for now.
For Decimals, put 0
This how many decimals places the token has. For instances, Ether has 18 decimal places, which is why sometimes you see amounts of ETH as 0.000043385. With that many decimal places, you can buy and sell fractions of ETH.
The Most Private Coin Ever has 0 decimal places, meaning it’s traded in whole numbers, like dollars. If you have 1 dollar bill, it’s one dollar – you can’t cut it up and have a fraction of a dollar.
Once you input these values and hit ‘Save’, you’ll see that the token was added successfully:

Now you’re ready to purchase your Most Private Coin Ever token(s).
You first want to make sure that you have enough ETH in your wallet to purchase a token.
This token is for sale at .003 ETH per token.
To fund your wallet, you’ll want to send ETH from Coinbase to your wallet address.
You can find your wallet address here:
It will be filled in with your address. Double click this and copy this address.
Purchasing your Token(s)
This part is now very easy.
Click ‘Send Ether & Tokens’ in the top navigation bar, which brings you to a screen like this:
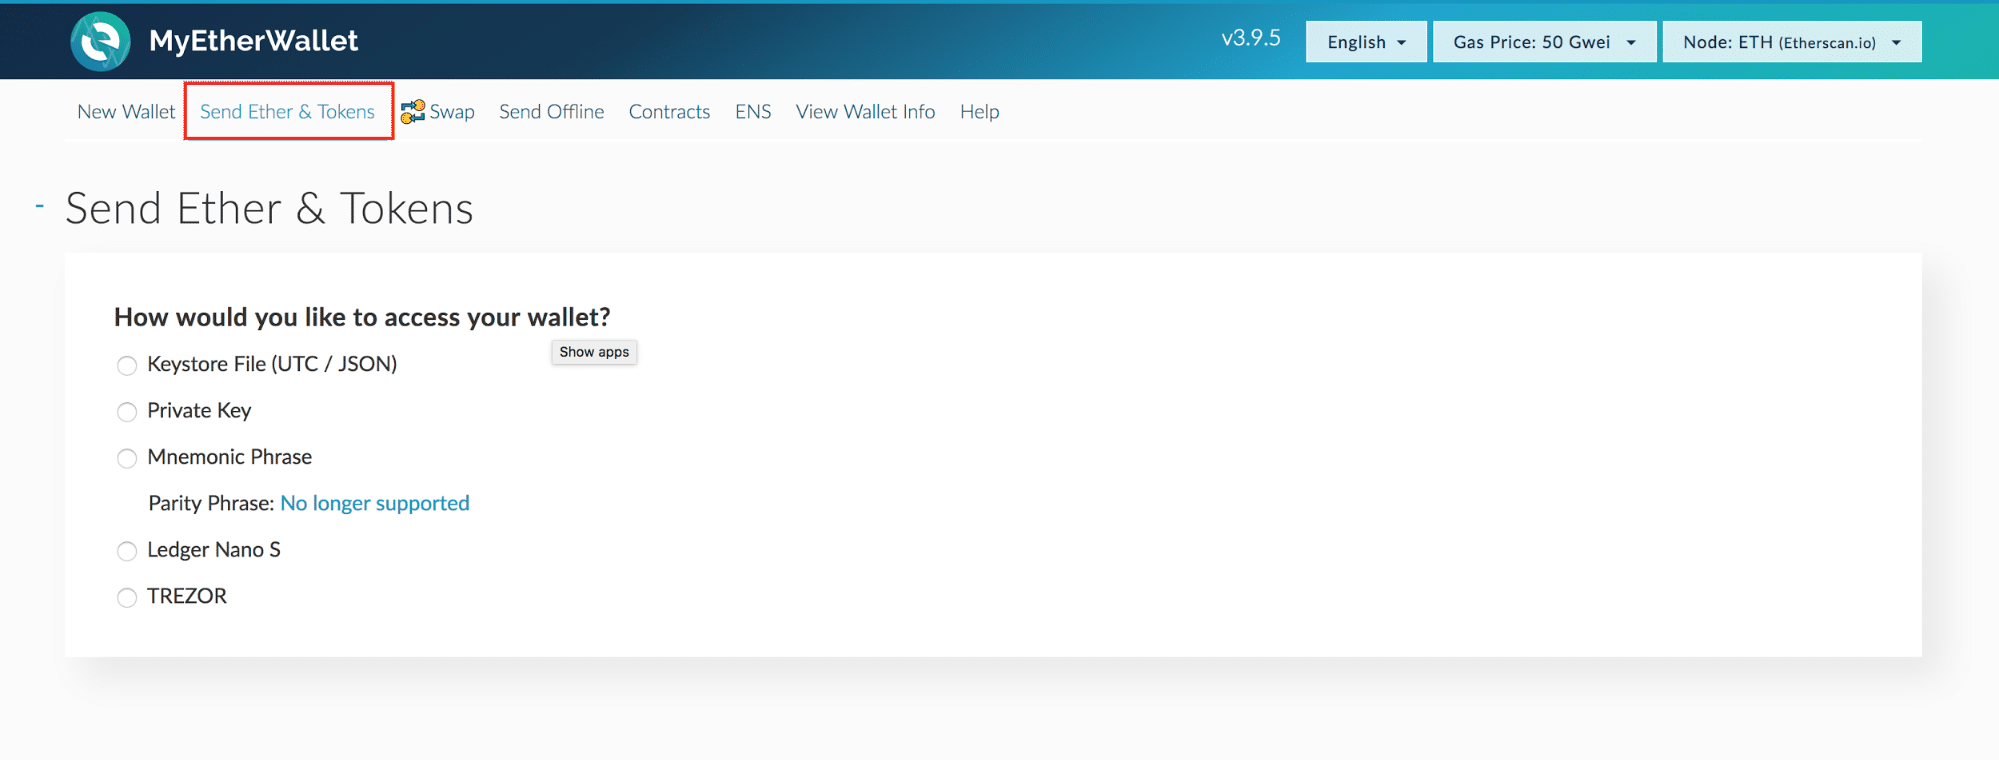
Access your wallet using your Keystore File or Private Key as done previously. It will then bring you to this screen:
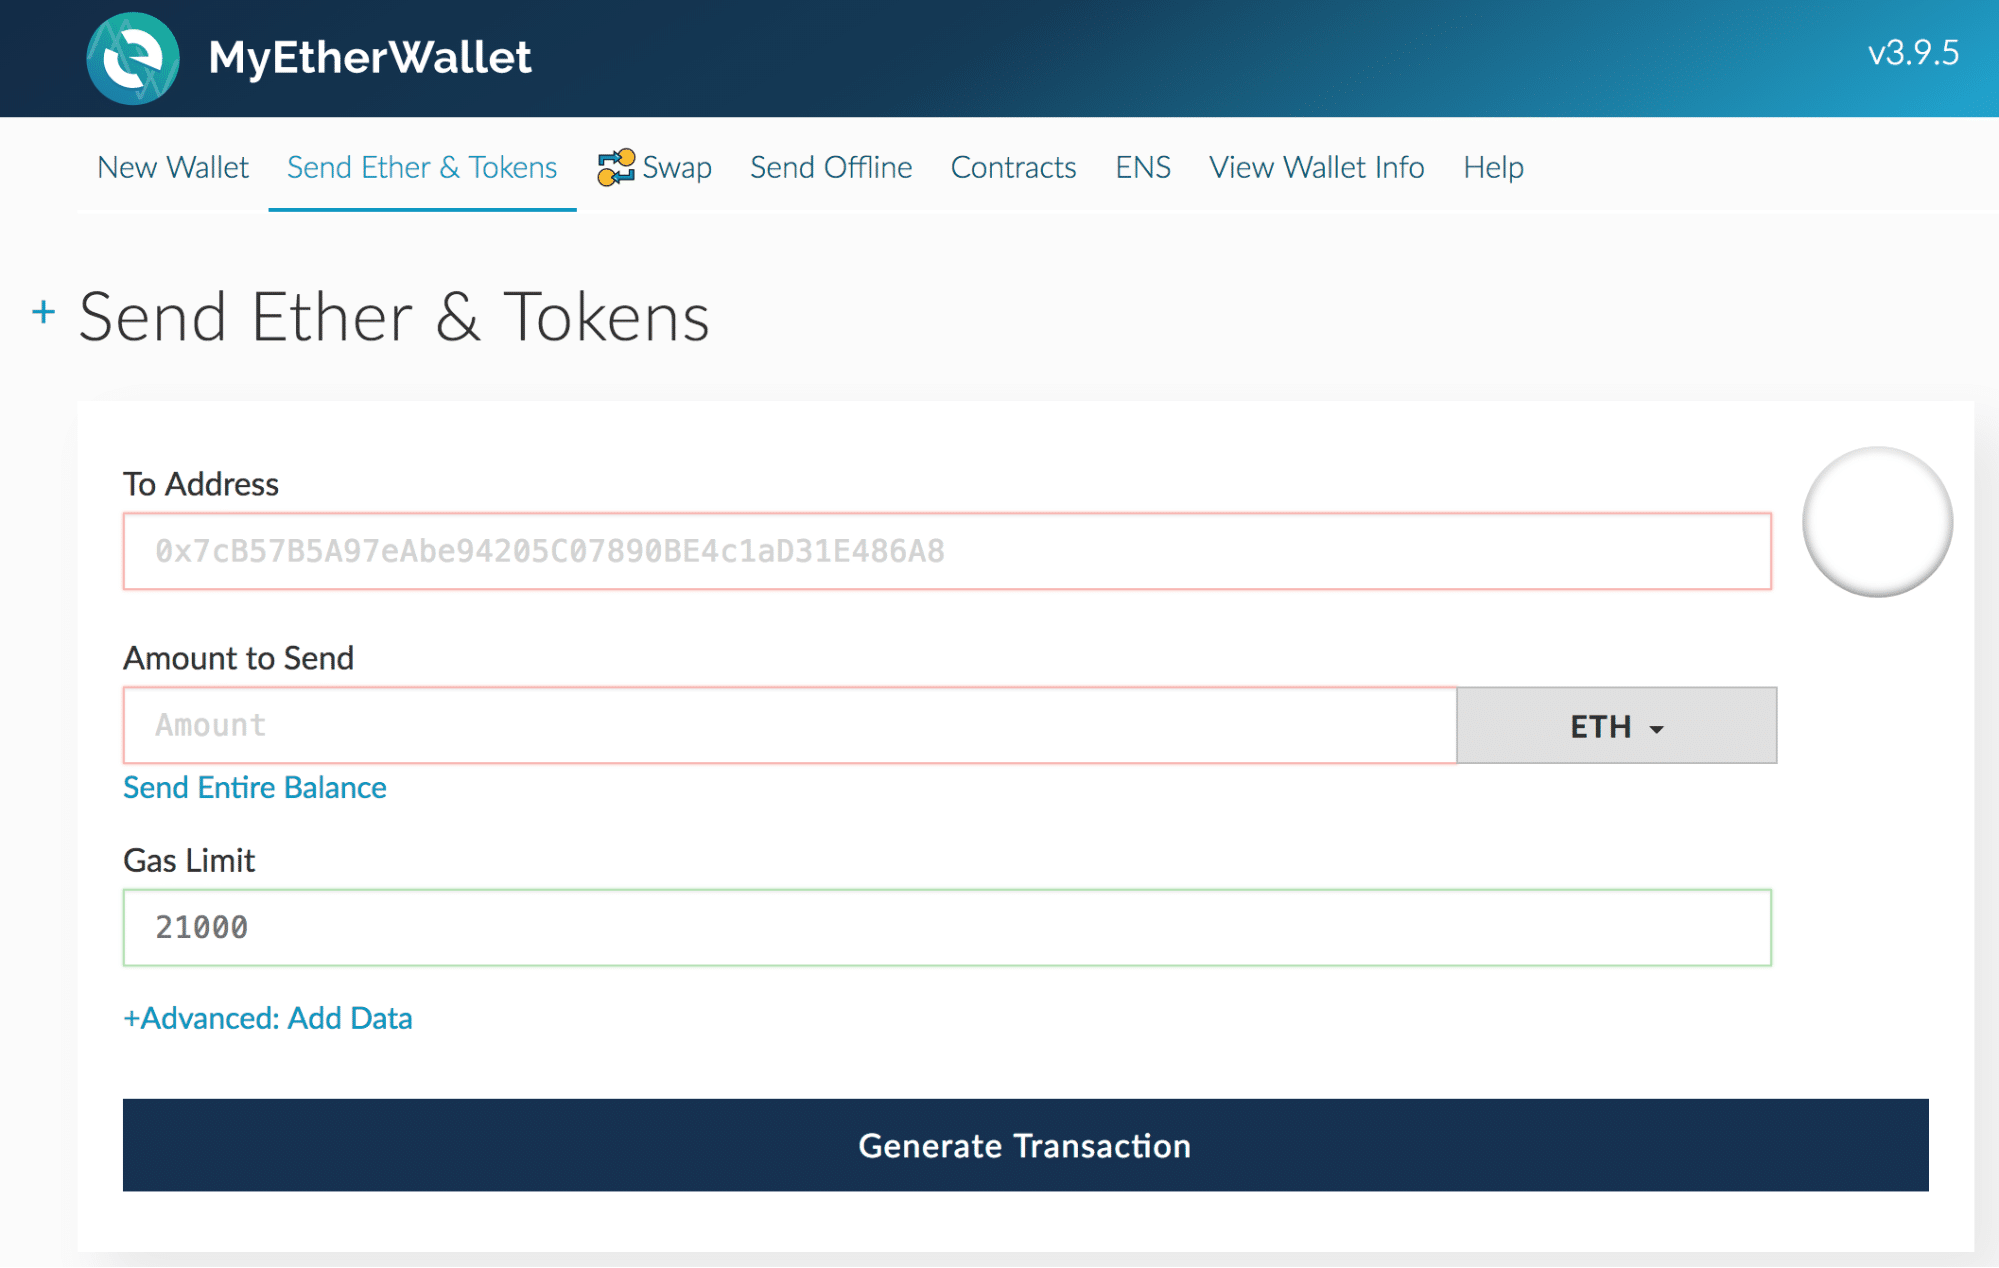
In the ‘To Address’ field, put: 0xc9307a0f0da6354b1f324bc9c52197e725d3cb59
In the Amount to Send, put .003 ETH in – which is ~$1 USD.
The gas limit will be automatically updated – no need to change that.
Once you’ve put in the correct information, click ‘Generate Transaction’ and hit ‘Confirm’ when the window pops up.
Wait a few minutes for the transaction to confirm across the blockchain, and once complete, if you go back to ‘View Wallet Info’ in the top navigation bar and unlock your wallet, you’ll see you have your token (it will say ‘1 MPCE’ instead of ‘0 MPCE’).
Congrats! You now know how to run your own wallet and purchase a custom token, off of a centralized exchange.
You can use this same process for Most ICOs and for other ethereum tokens on the market.
I also really enjoy reading this very good post. I don’t get the chance to see something like this very often quordle
masters dissertation writing help https://helpon-doctoral-dissertations.net/
example dissertation https://dissertations-writing.org/
dissertation writing assistance https://mydissertationwritinghelp.com/
where to get help for dissertation https://help-with-dissertations.com/
dissertation abstracts https://buydissertationhelp.com/
adult slots era https://slotmachinegameinfo.com/
youtube slots 2022 vegas https://www-slotmachines.com/
gladiator slots https://411slotmachine.com/
caesars slots free https://download-slot-machines.com/
double diamond slots https://beat-slot-machines.com/
free poker slots https://slot-machine-sale.com/
texas tea slots for fun https://slotmachinesforum.net/
loosest slots san diego https://slotmachinesworld.com/
geisha slots on pc https://candylandslotmachine.com/
my konami slots https://freeonlneslotmachine.com/
ceaser slots https://2-free-slots.com/
military gay dating https://speedgaydate.com/
westchester gay chat rooms https://gay-buddies.com/
gay chat rooms no cam needed https://gaytgpost.com/
which dating app has most gay guys https://gaypridee.com/
321 gay chat https://bjsgaychatroom.info/
2cannonade
I am a newbie and additionally quite advanced in age. I have been since long time wanting to jump into the block chain and cryptocurrency technology, mainly to participate in decentralizing potential it has for economics and the possibility of more equal distribution of wealth amongst the citizens of the world. But I found it daunting, confusing to wade through and understand the constantly widening options and the gamut of ads from countless and rapidly increasing entrepreneurs prizing their wares. And then I came, I don’t remember how, to your tutorial. As I read through, I decided there and then, not to first get better acquainted with the theory and wherewithals about this phenomenon but really to get my hands dirty, take a risk and finally since now I had stake in it, take the subject seriously. The best way to learn. And in one day, I feel I learned that way more than weeks of prodding online through white papers, wikis and articles. I had no crypto-currency accounts, no coinbase account, no BTC, no Ethreum till then. I even managed to test Changelly for converting cryptocurrencies. I trusted them and they were just great! Happened all within less than a day! Congratulations Max! I assume it is one of your aims. And I think you have succeeded well, especially when one considers the fact that I am coming from outside and it is all new. The tutorial is as simple and encouraging as it can get. Though the sequence of transferring funds from Coinbase should for _ at least for newbies _ proceed first before the chapter on acquiring a token and not in the middle of the process. It got me momentarily confused. And it just my opinion, for making the tutorial streamlined for complete green horns, which… Read more »
I am a newbie and additionally quite advanced in age. I have been since long time wanting to jump into the block chain and cryptocurrency technology, mainly to participate in decentralizing potential it has for economics and the possibility of more equal distribution of wealth amongst the citizens of the world. But I found it daunting, confusing to wade through and understand the constantly widening options and the gamut of ads from countless and rapidly increasing entrepreneurs prizing their wares. And then I came, I don’t remember how, to your tutorial. As I read through, I decided there and then, not to first get better acquainted with the theory and wherewithals about this phenomenon but really to get my hands dirty, take a risk and finally since now I had stake in it, take the subject seriously. The best way to learn. And in one day, I feel I learned that way more than weeks of prodding online through white papers, wikis and articles. I had no crypto-currency accounts, no coinbase account, no BTC, no Ethreum till then. I even managed to test Changelly for converting cryptocurrencies. I trusted them and they were just great! Happened all within less than a day! Congratulations Max! I assume it is one of your aims. And I think you have succeeded well, especially when one considers the fact that I am coming from outside and it is all new. The tutorial is as simple and encouraging as it can get. Though the sequence of transferring funds from Coinbase should for _ at least for newbies _ proceed first before the chapter on acquiring a token and not in the middle of the process. It got me momentarily confused. And it just my opinion, for making the tutorial streamlined for complete green horns, which… Read more »
I am a newbie and additionally quite advanced in age. I have been since long time wanting to jump into the block chain and cryptocurrency technology, mainly to participate in decentralizing potential it has for economics and the possibility of more equal distribution of wealth amongst the citizens of the world. But I found it daunting, confusing to wade through and understand the constantly widening options and the gamut of ads from countless and rapidly increasing entrepreneurs prizing their wares. And then I came, I don’t remember how, to your tutorial. As I read through, I decided there and then, not to first get better acquainted with the theory and wherewithals about this phenomenon but really to get my hands dirty, take a risk and finally since now I had stake in it, take the subject seriously. The best way to learn. And in one day, I feel I learned that way more than weeks of prodding online through white papers, wikis and articles. I had no crypto-currency accounts, no coinbase account, no BTC, no Ethreum till then. I even managed to test Changelly for converting cryptocurrencies. I trusted them and they were just great! Happened all within less than a day! Congratulations Max! I assume it is one of your aims. And I think you have succeeded well, especially when one considers the fact that I am coming from outside and it is all new. The tutorial is as simple and encouraging as it can get. Though the sequence of transferring funds from Coinbase should for _ at least for newbies _ proceed first before the chapter on acquiring a token and not in the middle of the process. It got me momentarily confused. And it just my opinion, for making the tutorial streamlined for complete green horns, which… Read more »
Two questions,
Is it because of the way that MCPE is setup that it accepts Ether in exchange for it’s tokens? Or would any other crypto work as well?
So does that work for any ICO and only ICOs? As in is there a Bitcoin address that I could send Ether to and receive Bitcoin in return?
Two questions,
Is it because of the way that MCPE is setup that it accepts Ether in exchange for it’s tokens? Or would any other crypto work as well?
So does that work for any ICO and only ICOs? As in is there a Bitcoin address that I could send Ether to and receive Bitcoin in return?
Two questions,
Is it because of the way that MCPE is setup that it accepts Ether in exchange for it’s tokens? Or would any other crypto work as well?
So does that work for any ICO and only ICOs? As in is there a Bitcoin address that I could send Ether to and receive Bitcoin in return?
… [Trackback]
[…] Find More Informations here: blockgeeks.com/how-to-setup-an-ethereum-wallet-and-buy-a-custom-token-a-guide-for-coinbase-users/ […]
… [Trackback]
[…] Find More Informations here: blockgeeks.com/how-to-setup-an-ethereum-wallet-and-buy-a-custom-token-a-guide-for-coinbase-users/ […]
… [Trackback]
[…] Find More Informations here: blockgeeks.com/how-to-setup-an-ethereum-wallet-and-buy-a-custom-token-a-guide-for-coinbase-users/ […]
Great Article, Thanks!
Is there a safe personal option to store non Ether tokens such as STEEM for example?
Hi Amgaur, my pleasure.
I don’t believe there’s an offline wallet that supports STEEM at this moment.
The Trezor is a great option to store your Ether/Bitcoin as well as any ERC20 token.
Here’s a link: https://trezor.io/
So I followed all the instructions and tried to send my ETH from my Coinbase account, when entering my wallet address it said it must be an email or Bitcoin address – what am I missing? there seems to be no option on Coinbase to send my ETH to my wallet using my wallet address
You’re most likely logged into your BTC wallet.
There’s an option to select your ETH wallet from Coinbase when you’re sending funds.
See this article w/ the image: https://support.coinbase.com/customer/portal/articles/971437
You’ll want to make sure it says ETH Wallet, not BTC wallet.
thanks – that was the issue
So I followed all the instructions and tried to send my ETH from my Coinbase account, when entering my wallet address it said it must be an email or Bitcoin address – what am I missing? there seems to be no option on Coinbase to send my ETH to my wallet using my wallet address
You’re most likely logged into your BTC wallet.
There’s an option to select your ETH wallet from Coinbase when you’re sending funds.
See this article w/ the image: https://support.coinbase.com/customer/portal/articles/971437
You’ll want to make sure it says ETH Wallet, not BTC wallet.
thanks – that was the issue
So I followed all the instructions and tried to send my ETH from my Coinbase account, when entering my wallet address it said it must be an email or Bitcoin address – what am I missing? there seems to be no option on Coinbase to send my ETH to my wallet using my wallet address
Great article!
Thanks Henrik!
Great article!
Thanks Henrik!
Great article!
Thanks Henrik!
Max, is the Chrome extension – MyEtherWallet CX – a legitimate, secure extension?
Hey John, never heard of it. I wouldn’t use the extension for MyEtherWallet unless you can confirm it’s legit – just use the website.
I found it in the Chrome store. It looks identical to the MyEtherWallet.com website.
I see. It looks legitimate as an open source project but keep in mind that any 3rd party things like this are susceptible to vulnerabilities (among others). Only use it if you deep down trust it.
Just saw your tweet. Nice.
[…] post How To Setup An Ethereum Wallet And Buy A Custom Token – A Guide for Coinbase Users appeared first on […]
[…] post How To Setup An Ethereum Wallet And Buy A Custom Token – A Guide for Coinbase Users appeared first on […]
[…] post How To Setup An Ethereum Wallet And Buy A Custom Token – A Guide for Coinbase Users appeared first on […]
Is it still a good idea to have an offline wallet if we don’t convert our holdings to MCPE? I like the run up of Ether and Bitcoin right now so not sure why I would try yet another currency?
Hey Dawn, it’s still a good idea if you’re holding a lot of cryptocurrency. An offline wallet prevents the funds from being frozen of one particular exchange goes down…but if you’re not holding too much (greater than what you’re willing to lose) and you’re not investing in any ICOs or custom tokens then keeping it all in exchange would be fine.
Ether and Bitcoin are great investments at the moment. MPCE is meant to teach people how to setup their own wallet token so that they’re familiar with the technology as it becomes more persistent in society.
Is it still a good idea to have an offline wallet if we don’t convert our holdings to MCPE? I like the run up of Ether and Bitcoin right now so not sure why I would try yet another currency?
Hey Dawn, it’s still a good idea if you’re holding a lot of cryptocurrency. An offline wallet prevents the funds from being frozen of one particular exchange goes down…but if you’re not holding too much (greater than what you’re willing to lose) and you’re not investing in any ICOs or custom tokens then keeping it all in exchange would be fine.
Ether and Bitcoin are great investments at the moment. MPCE is meant to teach people how to setup their own wallet + token so that they’re familiar with the technology as it becomes more persistent in society.
Is it still a good idea to have an offline wallet if we don’t convert our holdings to MCPE? I like the run up of Ether and Bitcoin right now so not sure why I would try yet another currency?
Hey Dawn, it’s still a good idea if you’re holding a lot of cryptocurrency. An offline wallet prevents the funds from being frozen of one particular exchange goes down…but if you’re not holding too much (greater than what you’re willing to lose) and you’re not investing in any ICOs or custom tokens then keeping it all in exchange would be fine.
Ether and Bitcoin are great investments at the moment. MPCE is meant to teach people how to setup their own wallet token so that they’re familiar with the technology as it becomes more persistent in society.