Contents
|
|
The following Hyperledger fabric tutorial series consists of three articles which will teach you various aspects about Hyperledger Fabric chaincode development ranging from CRUD operations, data protection, and chaincode testing.
An overview of the series:
- Article 1: Basic chaincode development and storing private data in collections
- Article 2: Advanced chaincode queries and the CouchDB GUI
- Article 3: A tutorial towards testing your chaincode with MockStub
Contents
Requirements
- 4GB of RAM (more is preferred)
- Docker, Docker-Compose, Code editor (e.g. Visual Studio Code), Git
- NodeJS version 8.9+ (Preferred is 8.9.4 – change your version with a version manager like ‘n’)
- Basic JavaScript knowledge
Objectives
- Create basic chaincode functions like reading and appending data to the ledger.
- Validate the created functionality via Docker exec commando.
- Configure private data collections.
- Add data to private data collections and retrieve an aggregated object from the ledger.
Introduction: Hyperledger fabric tutorial
In this first article, we will get used to to the Hyperledger Fabric boilerplate for NodeJS chaincode which we will be using throughout this tutorial series. The boilerplate is developed by a Belgian blockchain consultancy company called TheLedger.be, many thanks for open sourcing this boilerplate.
Why we use this boilerplate? It makes your life easier! For example, the boilerplate will automatically wrap and serialize the response with shim.success() and shim.error(). You can just return the javascript object and it will do the rest.
In this tutorial, we will focus on developing basic CRUD operations with and without private data collections, which we will test afterward. Besides that, we will give you a brief introduction into how private collections work.
Get The Code
The code can be found on Github michielmulders/hyperledger-fabric-blockgeeks. It’s recommended to use
git clone https://github.com/michielmulders/hyperledger-fabric-blockgeeks.git
to create a local clone of the repository on your machine and check out the first part of the tutorial with git checkout tutorial-1
Boilerplate Setup
Ok, so Hyperledger Fabric won’t start out of the blue… First, we need to pull the required Docker images which are needed for Fabric to create the needed containers (Certificate Authority, Orderer, Peer, Membership Service).
The scripts folder contains a script called bootstrap.sh which will by default pull version 1.2.0 of Hyperledger Fabric which supports the private collections functionality which we will use later. Make sure you have sufficient available space on your disk and a proper internet connection as the images are in total bigger than 1GB in size. Execute the script like this ./scripts/bootstrap.sh
When we have downloaded all the required images, we can move further to testing our boilerplate by making sure it starts without errors. Let’s execute the startFabric.sh script with ./scripts/startFabric.sh
A successful completion – a running Hyperledger Fabric network – should return a status 200.

Tip: If you can’t execute the Bash (.sh) script, try to give it executable rights with:
chmod +x bootstrap.sh
About Private Collections
Hyperledger Fabric has developed this concept of SideDBs which contain private data, only visible for the node that owns the SideDB. Basically, this is information that has not been shared publicly among the private network. Recently, Hyperledger has rebranded this as private collections which they see as a built-in “GDPR compliant” solution.
Before, confidentiality was created in the Hyperledger network via the uses of channels. The most common example is the negotiation about a price per kilo for a certain fish. Fisher A wants to offer a special price to Restaurant A because they are close friends, however, Fisher A doesn’t want Restaurant B to see this cheaper deal with Restaurant A. In order to create secure communication, two channels are created from Fisher A to Restaurant A and from Fisher A to Restaurant B.
However, the process of creating channels can become fairly complex in a fintech situation where we speak about thousands of clients, each having multiple channels. That’s the reason why Hyperledger Fabric discourages excessive use of channels as this slows down the network drastically, impacting the performance.
Jonas Snellinckx from TheLedger explains how private data can be better managed inside the Hyperledger network,
“Private data allows you to create collections of data using policies to define which parties in the channel can access the data. This access can simply be managed by adding policies to the collections. This allows for some data to be public and some to be private for some parties.”

Image 1: From slidedeck “Privacy Enabled Ledger” https://jira.hyperledger.org/browse/FAB-1151
For this tutorial, we are defining cars which will be stored inside the Fabric network. Data about the owner is private, so will be added to a private collection. Let’s code!
Hyperledger Fabric Chaincode
Let’s take a look at the current chaincode you can find at chaincode/node/src/MyChaincode.ts. The file contains one function, initLedger is used to pre-fill the ledger with some cars. A car object consists of make, model, color, and owner. When adding the car objects to the ledger, we give them all a unique key and doctype so it’s easier to retrieve them.
for (let i = 0; i < cars.length; i++) {

           const car: any = cars[i];


           car.docType = 'car';

           //car.key = `CAR${i}`;

           await stubHelper.putState('CAR' + i, car);

           this.logger.info('Added <--> ', car);

       }
1. Create New Car
Let’s code a function that creates a new car object in the world state of Hyperledger. The function accepts an array of strings, however, only the first element in the array contains a stringified JSON object. We use a helper function to easily check arguments using Yup. Besides checking arguments, it can also parse your arguments from string to your required data format. Yup will parse the stringified JSON object according to the provided schema we defined with Yup.object().shape({ my-object }.
async createCar(stubHelper: StubHelper, args: string[]) {

       const verifiedArgs = await Helpers.checkArgs<any>(args[0], Yup.object()

           .shape({

               key: Yup.string().required(),

               make: Yup.string().required(),

               model: Yup.string().required(),

               color: Yup.string().required(),

               owner: Yup.string().required(),

           }));

    …

}
Next, we can use this formatted object (verifiedArgs constant) to build a new car object. Don’t forget to add the doctype. The object is ready now to be appended to the ledger. Let’s use the stubHelper which contains all functionality for interacting with the ledger state like retrieving, adding, updating, and deleting data.
async createCar(stubHelper: StubHelper, args: string[]) {

       const verifiedArgs = await Helpers.checkArgs<any>(args[0], Yup.object()

           .shape({

               key: Yup.string().required(),

               make: Yup.string().required(),

               model: Yup.string().required(),

               color: Yup.string().required(),

               owner: Yup.string().required(),

           }));


       let car = {

           docType: 'car',

           make: verifiedArgs.make,

           model: verifiedArgs.model,

           color: verifiedArgs.color,

           owner: verifiedArgs.owner,

           key: verifiedArgs.key,

       };


       await stubHelper.putState(verifiedArgs.key, car);

   }
The putState function accepts a key and an object to be stored in the ledger. The putState function we use here is a wrapper function as the ledger can only store byte arrays and not JSON objects. The stubHelper does the magic for us, the original implementation can be found at ChaincodeStubInterface.PutState.
1.1 Validate Addition Of Car
We will use Docker to execute a command inside the container of the peer as the peer holds the latest version of the chaincode. To give the peer this updated version, let’s restart the Hyperledger Fabric network with ./scripts/startFabric.sh. Why use this script? It executes faster as it will only replace the chaincode on the peers and not restart the whole network.
Open a terminal and execute the following command: docker exec cli peer chaincode invoke -C mychannel -n fabcar -c ‘{“function”:”createCar”, “Args”:[“{\”key\”:\”CAR100\”, \”make\”:\”Peugot\”, \”model\”:\”307\”, \”color\”:\”green\”, \”owner\”:\”John Doe\”}”]}’
This command will send a new transaction proposal to the peer to be included in the world state of the ledger. We call our ‘createCar’ function and we add a stringified JSON object with key ‘CAR100’ as the first parameter in our array of strings. We have to escape the double quotes of the JSON object in order to pass it to our chaincode.
Notice the usage of the invoke keyword. It’s important to know the difference between invoke and query. The invoke keyword is used when we try to alter or add data to the ledger, whereas the query keyword is only used when retrieving information from the ledger.
Successful execution of the Docker command should return a ‘result: status:200’.

2. Read Data From Ledger
In order to read data from the ledger, we can look for a specific key. Let’s look for the newly created Car object with key ‘CAR100’. We start again with validating the arguments we receive in our chaincode, this time we accept just a key.
Next, we use the getStateAsObject function to retrieve a JSON object from the ledger for a specified key. It’s possible that the key does not exist. In that case, we can throw a custom error with NotFoundError which is part of the fabric-chaincode-utils, we import at the top of the file, like the stubHelper.
async queryCar(stubHelper: StubHelper, args: string[]): Promise<any> {


       const verifiedArgs = await Helpers.checkArgs<{ key: string }>(args[0], Yup.object()

           .shape({

               key: Yup.string().required(),

           }));


       const car = await stubHelper.getStateAsObject(verifiedArgs.key);

       if (!car) {

           throw new NotFoundError('Car does not exist');

       }


       return car;

   }
2.1 Validation Query Car Function
Use the following Docker command to query for Car with key ‘CAR100’, notice the use of the query keyword in this command.
docker exec cli peer chaincode query -C mychannel -n fabcar -c ‘{“function”:”queryCar”,”Args”:[“{\”key\”:\”CAR100\”}”]}’

3 Private Collections
To get started, we first need a collections configuration file collections_config.json which includes the collection name and policy. The policy is similar to an endorsement, this allows us to use the already existing policy logic like OR, AND, … operators.
3.1 Private Collection Configuration
A private collection consists of a name and a policy, other properties are out of scope for this tutorial and are optimized for the Hyperledger network. We use a collection named “privateCarCollection” with a policy where only one member of an organization has to validate the transaction.
 
[

 {

   "name": "privateCarCollection",

   "policy": "OR ('Org1MSP.member','Org2MSP.member')",

   "requiredPeerCount": 0,

   "maxPeerCount": 3,

   "blockToLive":1000000

 }

]
3.2 Add Data to Private Collection
Now we have our private collection, let’s use this in our code. It’s not a big job to tell the stubHelper to save the data to a private collection instead of spreading it across the network.
await stubHelper.putState(

           verifiedArgs.key,

           car,

           {privateCollection: 'privateCarCollection'}

       );
Let’s modify our code slightly to just store the car owner and his address in the private car collection. Remember to add the same key to this new private car object in order to make it easier to retrieve the full object. Besides that, we will change the Yup object validator to accept only a key, address, and owner property. As a best practice, we change the doctype to ‘privateCar’.
async createPrivateCar(stubHelper: StubHelper, args: string[]) {

const verifiedArgs = await Helpers.checkArgs(args[0], Yup.object()

.shape({

key: Yup.string().required(),

address: Yup.string().required(),

owner: Yup.string().required(),

}));

let car = {

docType: 'privateCar',

address: verifiedArgs.address,

owner: verifiedArgs.owner,

key: verifiedArgs.key,

};

await stubHelper.putState(

verifiedArgs.key,

car,

{privateCollection: 'privateCarCollection'}

);

}
3.3 Query Aggregated Car
To create the aggregated car object, we will query both the Hyperledger network and the private data collection containing our car owner and address.
First, let’s retrieve the public car with:
let publicCar = await stubHelper.getStateAsObject(verifiedArgs.key);
Next, we can query the private car data in the same manner:
let privateCar = await stubHelper.getStateAsObject(verifiedArgs.key, {privateCollection: ‘privateCarCollection’})
At last, let’s return the aggregated car object. We are using the object spread (three dots ‘…’) which is an ECMAscript 2018 method that takes all properties of each object and merges it into one new object.
async queryAggregatedCar(stubHelper: StubHelper, args: string[]): Promise<any> {


       const verifiedArgs = await Helpers.checkArgs<{ key: string }>(args[0], Yup.object()

           .shape({

               key: Yup.string().required(),

           }));


       let publicCar = await stubHelper.getStateAsObject(verifiedArgs.key);

       if (!publicCar) {

           throw new NotFoundError('Car does not exist');

       }


       let privateCar = await stubHelper.getStateAsObject(

           verifiedArgs.key,

           {privateCollection: 'privateCarCollection'}

       );


       const car = {

           ...publicCar,

           ...privateCar

       };


       return car;

   }
3.4 Validate Aggregated Query
At bullet 1.1 in this tutorial, we created a new car with key ‘CAR100’. Let’s use this key to create a new private data object via the Docker exec command.
docker exec cli peer chaincode invoke -C mychannel -n fabcar -c ‘{“function”:”createPrivateCar”, “Args”: [“{ \”key\”:\”CAR100\”, \”address\”: \”Parklane 20, Italy\”, \”owner\”: \”John Doe\” }”]}’
Now we have both the public as private car object, let’s try the aggregate call like this. Remember to use the query keyword as we are only retrieving data.
docker exec cli peer chaincode query -C mychannel -n fabcar -c ‘{ “function”:”queryAggregatedCar”, “Args”: [“{ \”key\”: \”CAR100\” }”]}’
This should return:
{“color”:”green”,”docType”:”privateCar”,”key”:”CAR100″,”make”:”Peugot”,”model”:”307″,”owner”:”John Doe”,”address”:”Parklane 20, Italy”}
4. What did we learn?
The stubHelper is the most important tool for interacting with data in the ledger. It is capable of adding, updating, and deleting data. But, can also assist in locating and querying objects in the ledger and returning them as JSON objects.
Code Cheatsheet
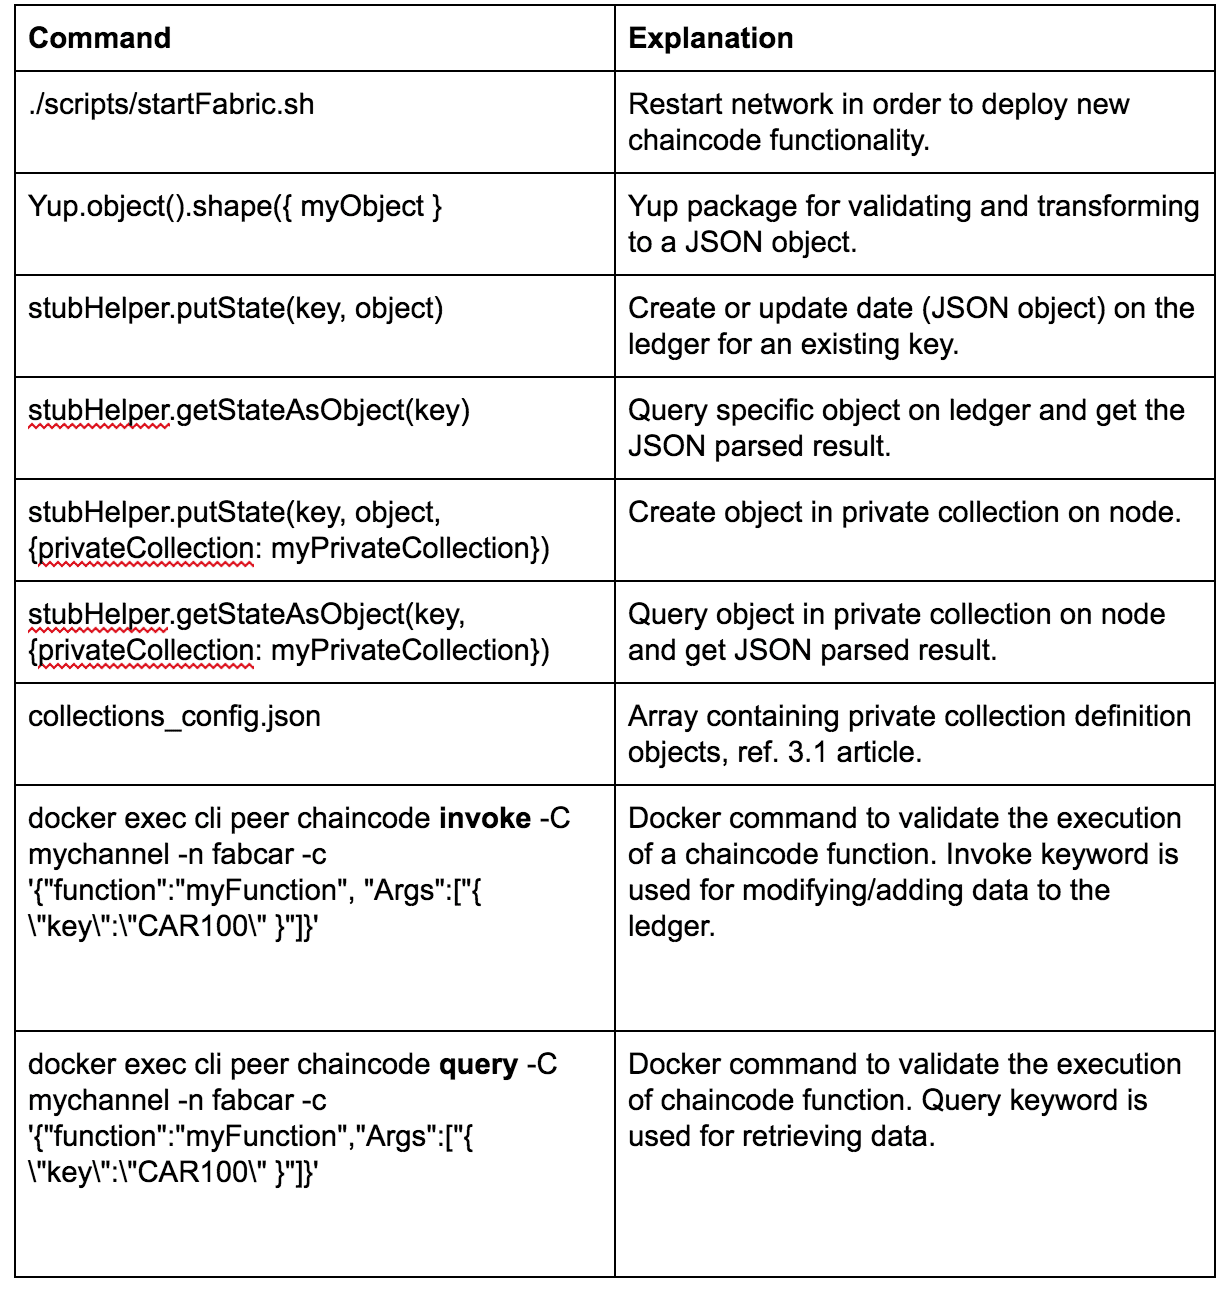
Want to dive deeper into hyperledger? Check out our Hyperledger Accelerator





hi nice job i want to know how to add collection_config.json file in startFabric.sh file plz help me when i add path to collection_config.json file then one error appear wrong confrigation file plz help me i am stuck in this problem since 4 days
A very nice post Mr. Michiel Mulders, definitely coming back to cover this again, moving over to Hyperledger course shortly so your timing is perfect…well done!